/ Knowledge base /
How to set up the tier-based loyalty program?How to set up the tier-based loyalty program?
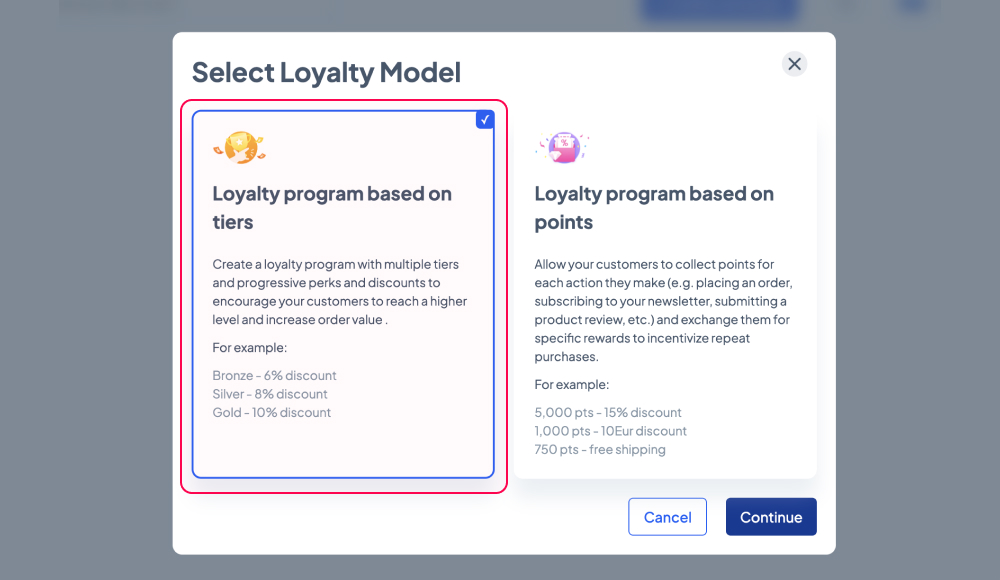
Loyalty programs are a fantastic way to reward and retain your valued customers. Here at theMarketer, we offer two types of loyalty programs: tier-based and point-based.
A tier-based program is ideal for motivating customers to reach the next level, where bigger and better rewards await.
Here is how to set up your tier-based loyalty program with theMarketer:
1. Go to 'Engagement' > 'Loyalty program' and click 'Setup Loyalty program'.
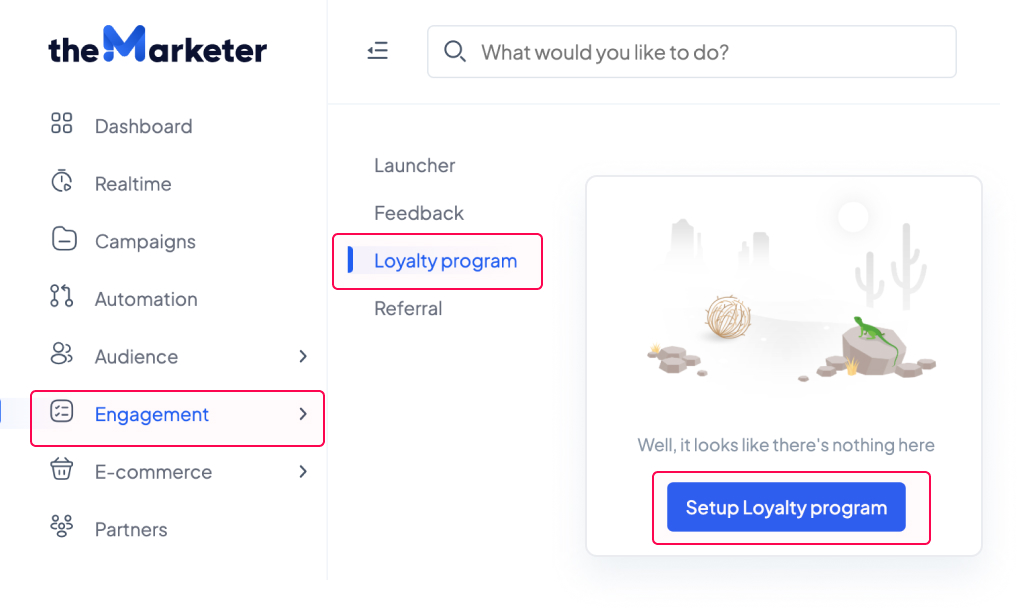
2. Select the loyalty model based on tiers
3. Decide on the number of tiers your program will feature.
Aim for a balance - we recommend 5-7 tiers to keep customers engaged without overwhelming them. Use the '+Add tier' button to add more tiers or the bin button to delete the tiers that you don’t want to use.

4. Make your tiers appealing with catchy names and unique icons.
Select from the default icon sets on the right or upload custom ones.

To change the icon of a tier, click the existing one and another window will appear, asking you to locate the file on your computer. Use transparent PNGs, ideally 256x256 pixels in dimension. Once you’ve selected the file, click ‘Open’.
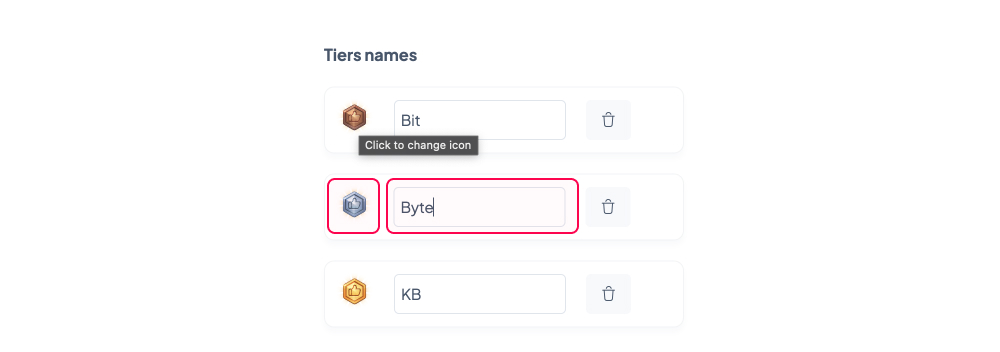
To change the name a tier, simply click on the respective field and type the new name.
5. Set the point requirements for each tier.
Aim for challenging, yet achievable targets. Making top tiers too easy to reach could affect your margins. But making it too hard to advance will make people lose interest because the effort will be greater than the reward. You could use the following milestones: 1,000 points to reach the second tier, 3,000 for the third, 8,000 for the fourth, etc.
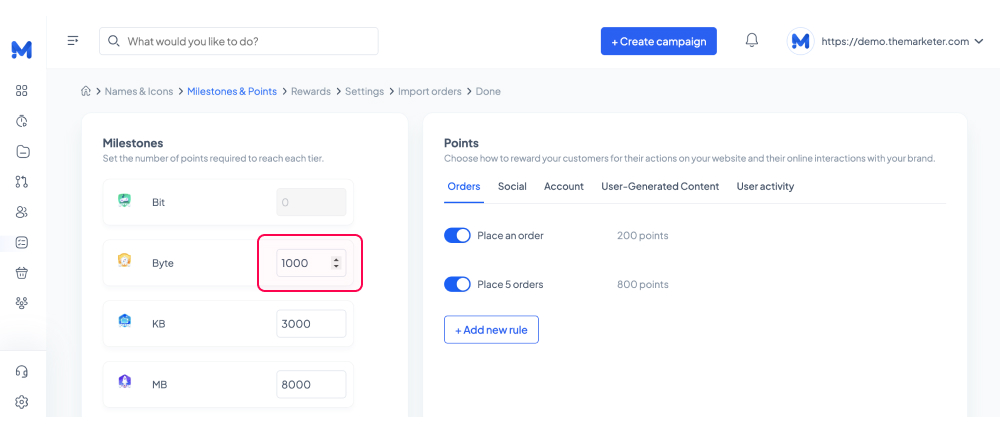
6. Set the point allocation rules and determine how much each action will be worth.
theMarketer allows you to reward your loyalty program members for a wide range of actions, from placing orders and referring their friends to leaving reviews and interacting with your newsletter campaigns.
You can add new rules or deactivate them, and you can personalize them to match your business goals.
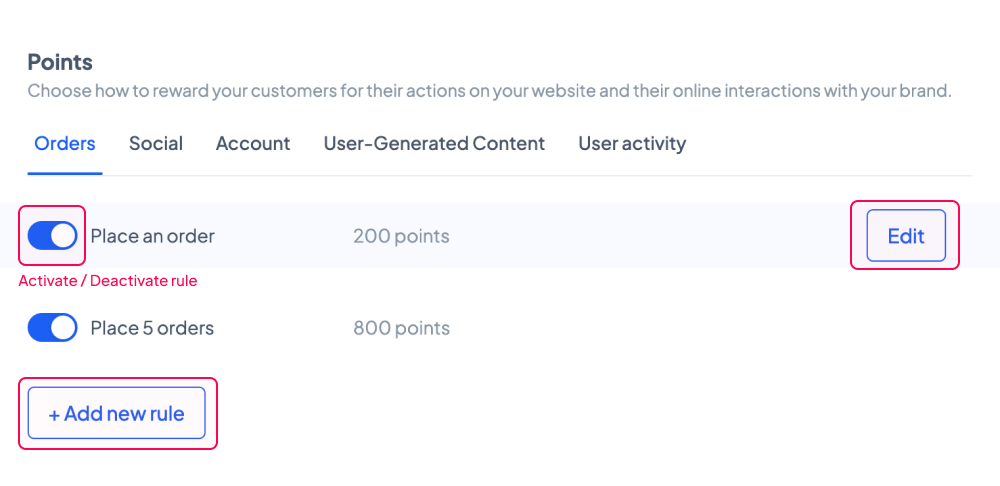
a. Order-related events
To edit a rule, click the 'Edit' button on the right. A new box will appear. Here you can change the type of event that will trigger the point allocation and various details about the rule.
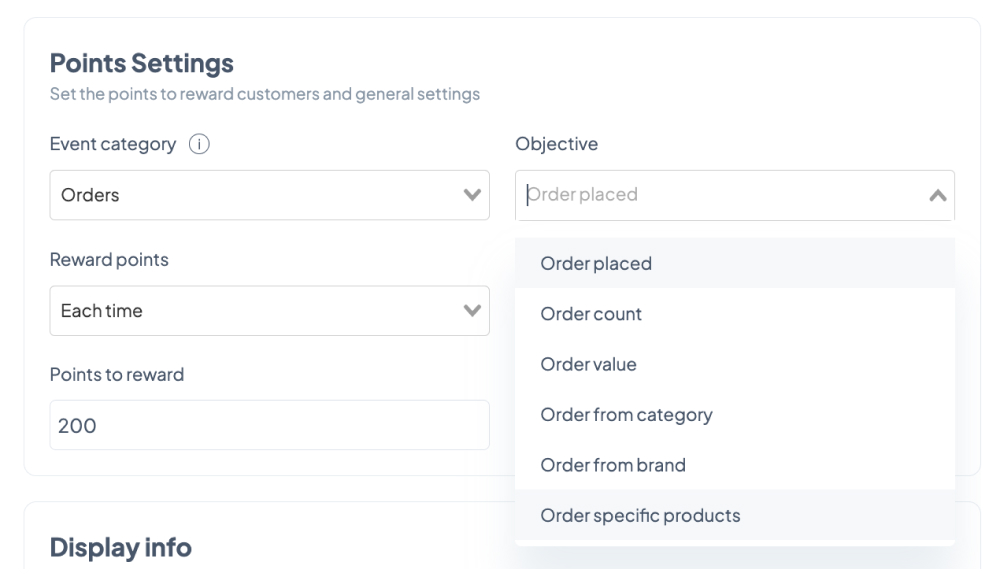
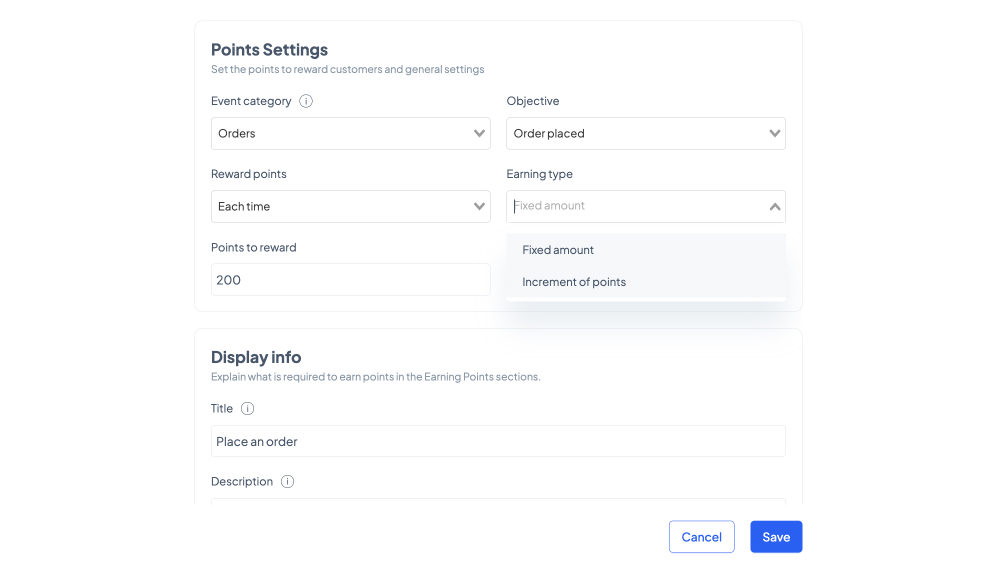
Order placed - Select the ‘Fixed amount’ option under ‘Earning type’ to allocate the specific number of points mentioned in the ‘Points to reward’ field when a customer places an order. To apply this rule only for their first order, select the ‘Only once’ option under ‘Reward points’. To increase their point balance for every order they place, select the ‘Each time’ option.
To allocate the specific number of points mentioned in the ‘Points to reward’ field based on the value of the order, select the ‘Increment of points’ option under ‘Earning type’. This rule can also be applied once or on a recurring basis.
For example, your customers could win 500 points on their first order if you set the rule to ‘Only once’, ‘Fixed amount’, and type ‘500’ in the ‘Points to reward’ field. And then they could win 50 points for every 20 euros they spend on their next orders. To do so, create another rule set to ‘Each time’, ‘Increment of points’, type ‘50’ in the ‘Points to reward’ field and ‘20’ in the field mentioning the amount.
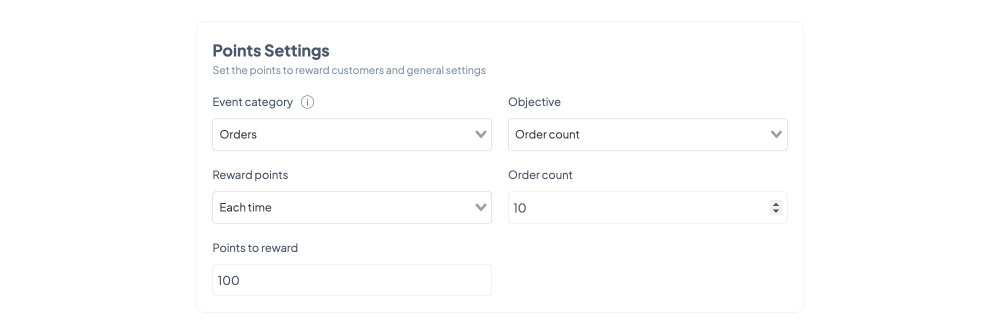
Order count - To encourage your customers to purchase more frequently, you can allocate the specific number of points mentioned in the ‘Points to reward’ field when a customer places their nth order. You can edit the number of order in the 'Order count’ field.
Order value - To boost your AOV, you can allocate points to your customers if they place an order that exceeds a specific amount. You can set the minimum order value in the ‘Order value’ field and the number of points to be allocated in the ‘Points to reward’ field.
To apply this rule only for their first order that exceeds the minimum order value, select the ‘Only once’ option under ‘Reward points’. To increase their point balance for every order that exceeds the minimum order value, select the ‘Each time’ option.
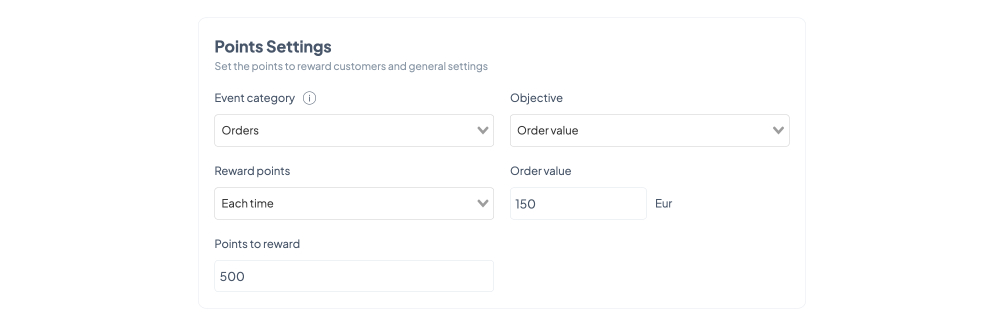
For example, your customers could win 500 points for every order that exceeds 150 euros if you set the rule to ‘Each time’, type ‘150’ in the “Order value’ field and type ‘500’ in the ‘Points to reward’ field.
Order from category - To promote a certain product category, you can allocate the specific number of points mentioned in the ‘Points to reward’ field when your customers purchase a product in the category selected in the ‘Category’ field.
You can apply this rule only the first time the customer purchases from the selected category by choosing the ‘Only once’ option under ‘Reward points’ or increase their point balance every time they buy an item in that category by selecting the ‘Each time’ option.
Order from brand - To promote a certain brand, you can allocate the specific number of points mentioned in the ‘Points to reward’ field when your customers purchase a product from the brand selected in the ‘Brand’ field.
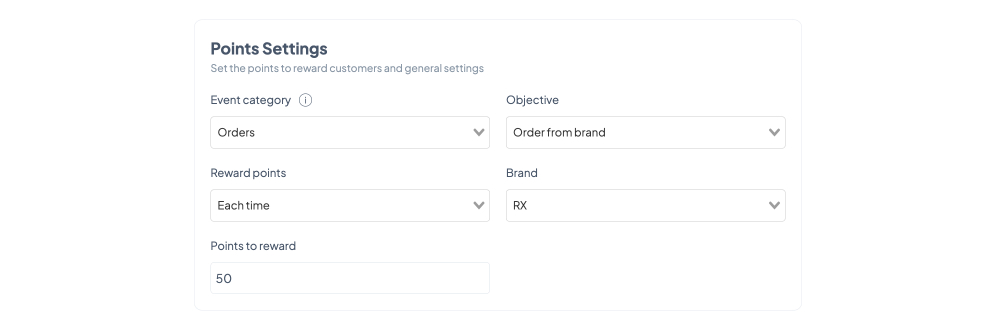
You can apply this rule only the first time the customer purchases from the selected brand by choosing the ‘Only once’ option under ‘Reward points’ or increase their point balance every time they buy an item from that brand by selecting the ‘Each time’ option.
For example, if you’re a multi-brand store and you’ve negotiated better terms with a particular brand you can encourage your customers to purchase their products by offering them 50 points for every order that includes a product from that brand. In this case, you need to set the rule to ‘Each time’, select the brand in the ‘Brand’ field, and type ‘50’ in the ‘Points to reward’ field.
Order specific products - You can promote up to 3 specific products, which you can select under the ‘Products’ section, by allocating the specific number of points mentioned in the ‘Points to reward’ field when your customers purchase them.
You can apply this rule only the first time the customer purchases those products by choosing the ‘Only once’ option under ‘Reward points’ or increase their point balance every time they buy them by selecting the ‘Each time’ option.
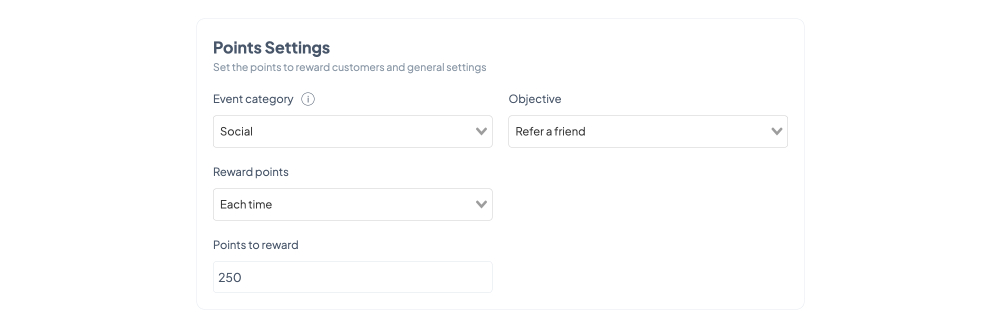
b. Social-related events
Refer a friend - Leverage word-of-mouth. Allocate the specific number of points mentioned in the ‘Points to reward’ field when your customers refer your business to their friends. You can apply this rule only the first time they make the referral by choosing the ‘Only once’ option under ‘Reward points’ or increase their point balance every time by selecting the ‘Each time’ option.
To see who your top Promoters are, go to 'Engagement' > 'Referral'.
Facebook / Instagram / WhatsApp / Twitter share - The best way to promote yourself on social media is through social proof. Allocate the specific number of points mentioned in the ‘Points to reward’ field when your customers spread the word about your business on their social media profiles.
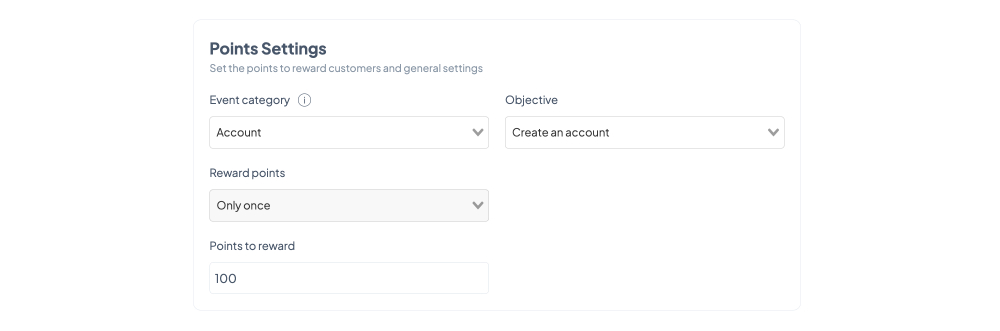
c. Account-related events
Create an account - Entice your customers to join your loyalty program while giving them a head start. You can allocate the specific number of points mentioned in the ‘Points to reward’ field when your customers create their account.
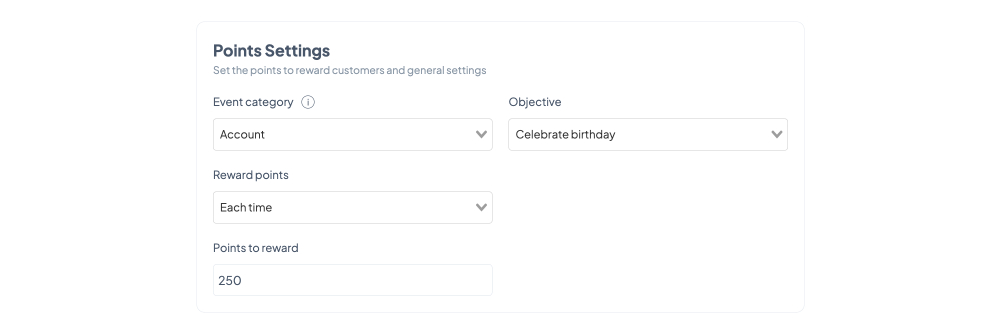
Celebrate birthday - Give your customers a surprise gift. Allocate the specific number of points mentioned in the ‘Points to reward’ field on their birthday. You can apply this rule only the first time they celebrate their birthday by choosing the ‘Only once’ option under ‘Reward points’ or increase their point balance every year by selecting the ‘Each time’ option.
Celebrate account anniversary - Celebrate important milestones. Allocate the specific number of points mentioned in the ‘Points to reward’ field when another year passes since your customer joined your loyalty program. You can apply this rule only the first time they celebrate their anniversary by choosing the ‘Only once’ option under ‘Reward points’ or increase their point balance every year by selecting the ‘Each time’ option.
d. UGC-related events
Write an order / product review - To encourage customers to leave reviews, which in turn will help you turn prospects into customers, you can allocate the specific number of points mentioned in the ‘Points to reward’ field when your customers leave an order or a product review.
You can apply this rule only the first time the customer reviews an order or a product by choosing the ‘Only once’ option under ‘Reward points’ or increase their point balance every time they leave a review by selecting the ‘Each time’ option.
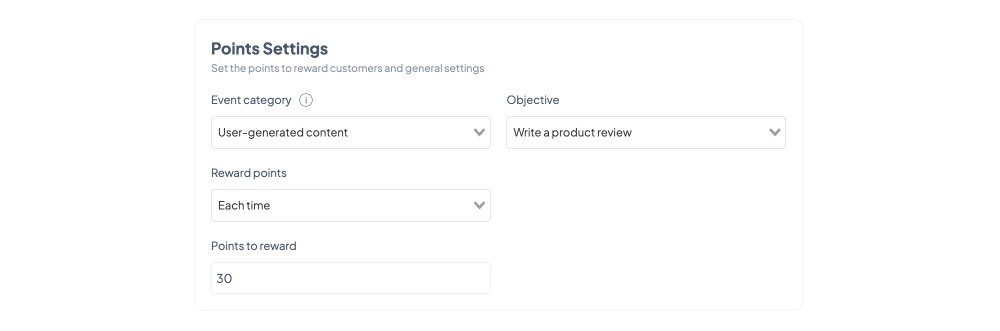
For example, your customers could win 30 points for every product review they leave if you set the rule to ‘Each time’ and type ‘30’ in the ‘Points to reward’ field.
Upload a photo - Reviews that feature photos are more convincing and impactful. You can encourage customers to leave reviews that include images by allocating the specific number of points mentioned in the ‘Points to reward’ field when your customers also upload a photo when they leave a review.
You can apply this rule only the first time the customer leaves a review featuring an image by choosing the ‘Only once’ option under ‘Reward points’ or increase their point balance every time they upload visuals to a review by selecting the ‘Each time’ option.
Submit answer to a poll - Polls are a great way to gather your customers’ feedback and make sure your business is heading the right direction. To encourage customers to engage with your polls, you can allocate the specific number of points mentioned in the ‘Points to reward’ field when your customers submit their answer to a poll.
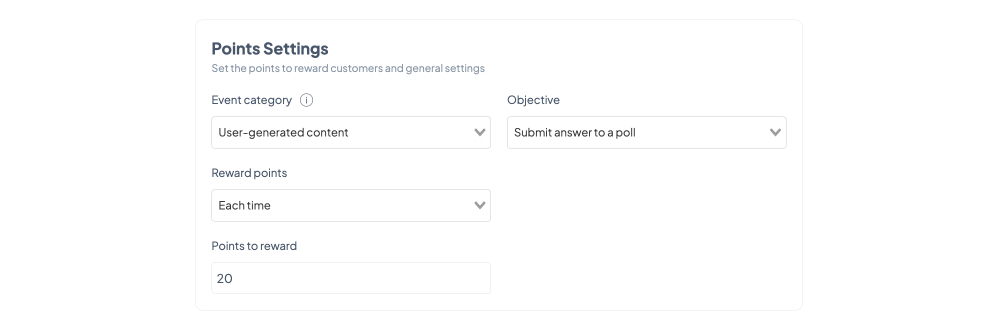
You can apply this rule only the first time the customer submits an answer by choosing the ‘Only once’ option under ‘Reward points’ or increase their point balance every time they engage with your polls by selecting the ‘Each time’ option.
e. User activity-related events
Subscribe to newsletter / SMS / push notifications - You can easily multiply your points of contact with your customers. To encourage your customers to subscribe to your newsletter, SMS, or push notifications campaigns, you can allocate the specific number of points mentioned in the ‘Points to reward’ field when they choose to subscribe to the communication channel you’ve selected.
Open newsletter - Low open rates can affect your sender reputation. And subject lines are important, but there are other ways you can maximize your chances of getting a high open rate. To encourage customers to open your newsletters, you can allocate the specific number of points mentioned in the ‘Points to reward’ field when they open your campaigns.
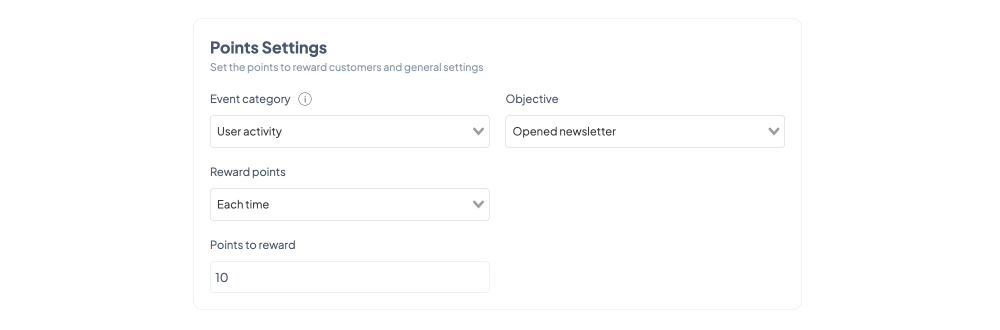
You can apply this rule only the first time the customer opens a newsletter by choosing the ‘Only once’ option under ‘Reward points’ or increase their point balance every time they open your campaigns by selecting the ‘Each time’ option.
For example, your customers could win 10 points for every newsletter they open if you set the rule to ‘Each time’ and type ‘10’ in the ‘Points to reward’ field.
Click newsletter / push notification - To bring customers back to your website, you can encourage them to click your newsletter or push notifications campaigns by allocating the specific number of points mentioned in the ‘Points to reward’ field when they engage with your campaigns.
You can apply this rule only the first time the customer clicks a newsletter or push notification campaign by choosing the ‘Only once’ option under ‘Reward points’ or increase their point balance every time they click your campaigns by selecting the ‘Each time’ option.
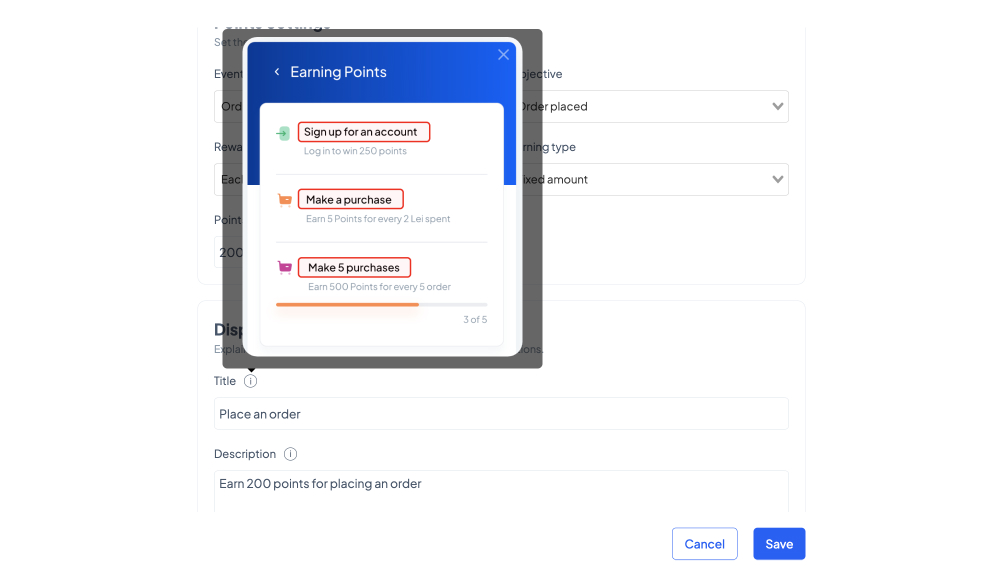
For each rule you set you can customize the title and the description that will be visible in the on-site Launcher in the ‘Display info’ section. These should instruct users what they need to do to win points and how many points they will get. Keep the texts short and clear (e.g., “Make a purchase - Earn 500 points for every order over 150 euro”).
You may also want to create limited-time campaigns that incentivize users to react quickly. You can do this in the ‘Effective Dates’ section. Type the starting date in a day-month-year format or click the calendar icon to select the date your rule will begin to take effect using the pop-up window. If left blank, the rule will take immediate effect.
To set an end date for your rule, click the ‘Limit rule in time’ toggle button and type or choose the date your rule will stop take effect.
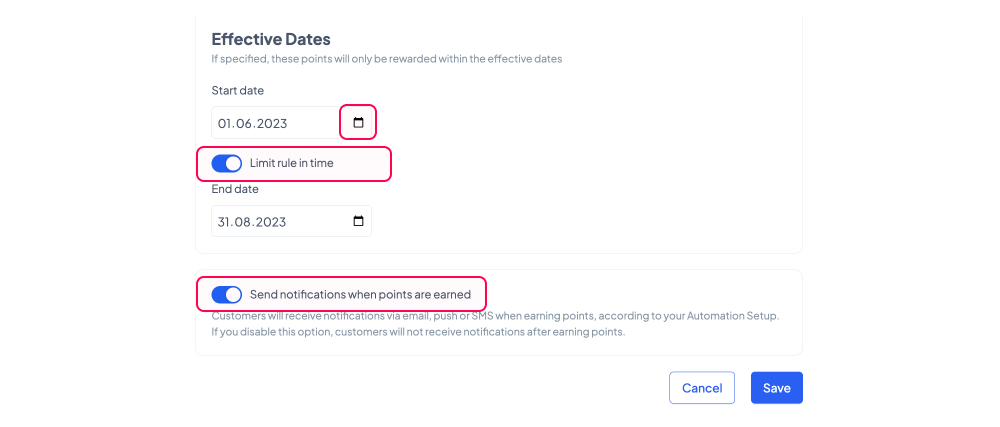
To make your loyalty program even more engaging, you can notify customers when they have earned points according to the rule you’re setting. Make sure the ‘Send notifications when points are earned’ toggle button is on (blue) and that you’ve previously set a corresponding automation journey. If you haven’t already, go to ‘Automation’ and use the ‘Points earned’ pre-build map under ‘Loyalty Program’ section to customize your journey.
7. Set the benefits for each tier.
Make your customers’ hard work and engagement pay off and reward them with increasingly enticing benefits as they level up. You can select 3 types of rewards for each tier.
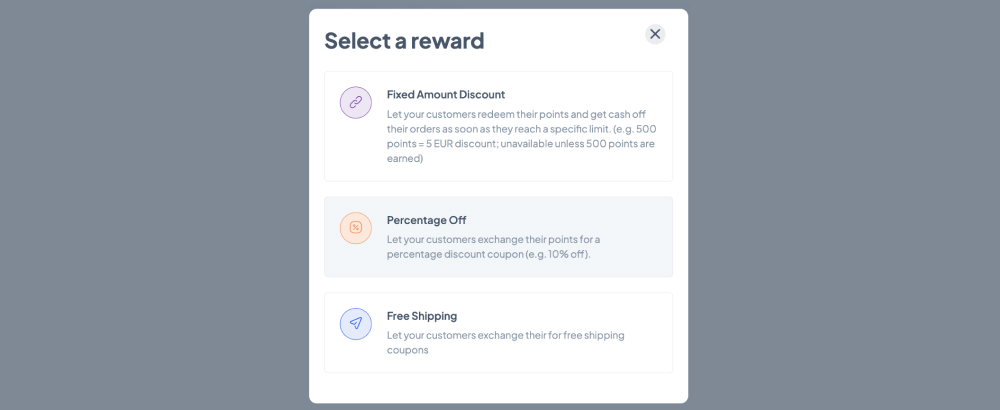
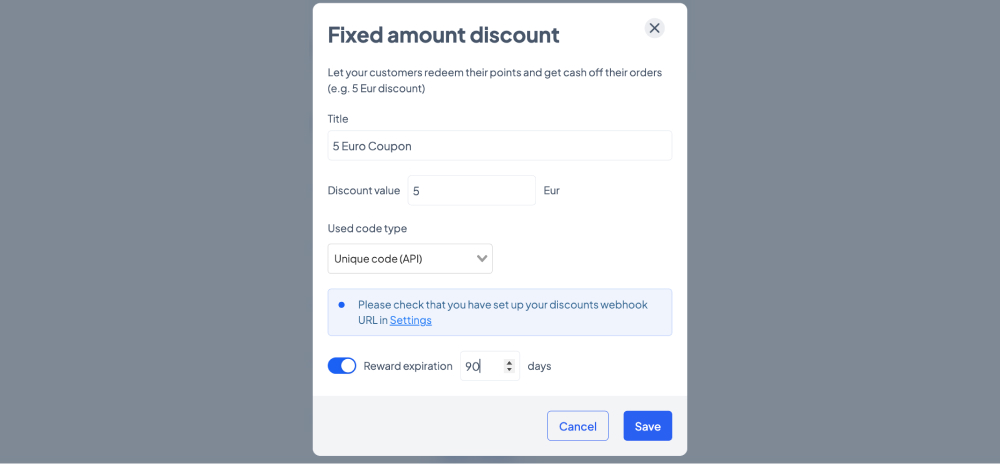
a. Fixed Amount Discount
This option allows your customers to enjoy a discount amounting to the value you mention in the ‘Discount value’ section by using a code.
You should type in the ‘Title’ field the message that will be visible in the on-site Launcher. This text should inform users about the benefits they will get when reaching that tier. Keep the texts short and clear (e.g., “15 Euro Discount”).
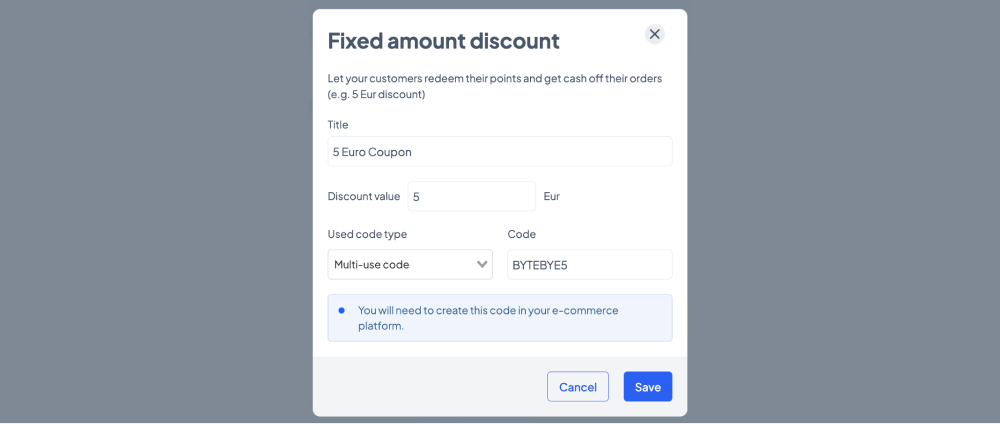
For the coupons, you can use two types of codes:
- Multi-use codes - which you need to create first in your e-commerce platform then paste in the ‘Code’ field when the ‘Multi-use code’ option is selected under ‘Used code type’
- Unique codes (API) - these will be automatically generated through API.
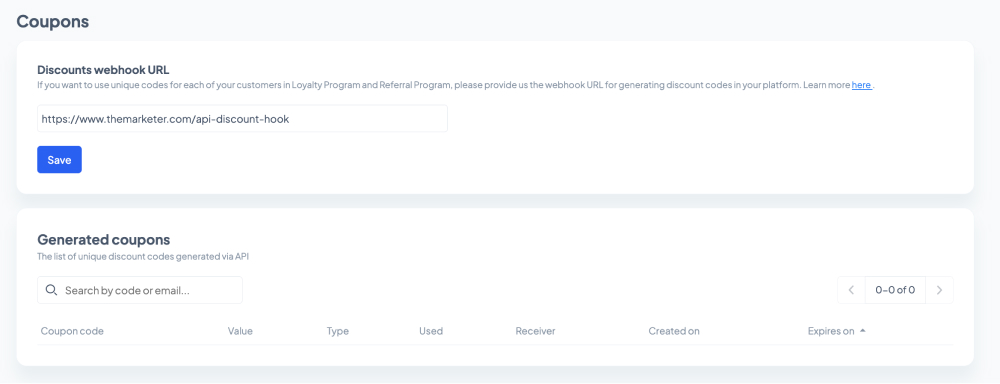
To dynamically generate discount codes, you will need to have an endpoint on your website that can be called by theMarketer. This webhook URL for generating discount codes in your platform needs to be mentioned in the ‘Settings’ > ’Coupons’ > ’Discounts webhook URL’ section. On the same page, you will also see the list of unique discount codes generated via API.
For unique codes you can also set an expiration date if you click the ‘Reward expiration’ toggle button. Once it’s turned on (blue) you can type the number of days customers will be able to use the code to get the fixed amount discount.
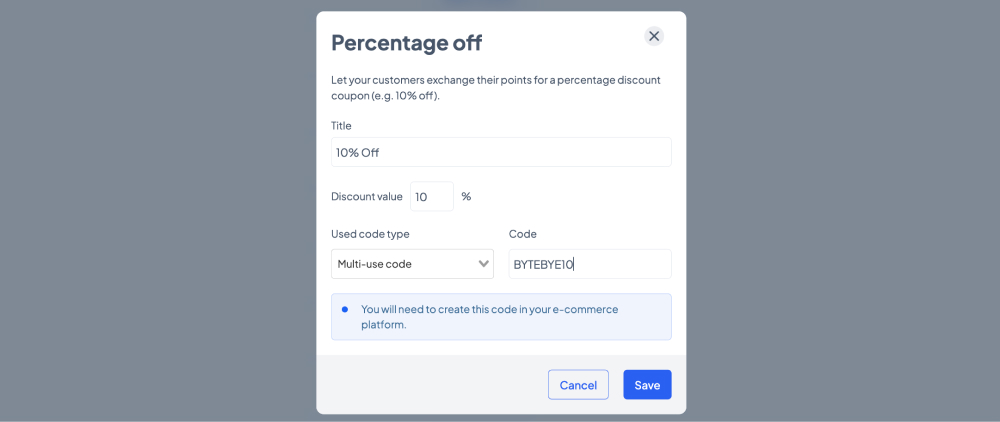
b. Percentage Off
This option allows your customers to enjoy a percentage discount amounting to the value you mention in the ‘Discount value’ section by using a code.
You should type in the ‘Title’ field the message that will be visible in the on-site Launcher. This text should inform users about the benefits they will get when reaching that tier. Keep the texts short and clear (e.g., “10% Off”).
For the coupons, you can use two types of codes:
- Multi-use codes - which you need to create first in your e-commerce platform then paste in the ‘Code’ field when the ‘Multi-use code’ option is selected under ‘Used code type’
- Unique codes (API) - these will be automatically generated through API.
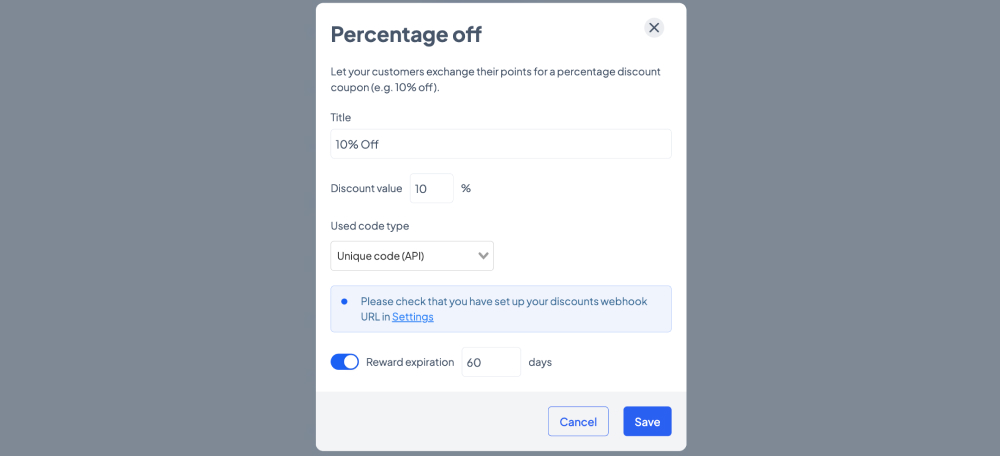
To dynamically generate discount codes, you will need to have an endpoint on your website that can be called by theMarketer. This webhook URL for generating discount codes in your platform needs to be mentioned in the ‘Settings’ > ’Coupons’ > ’Discounts webhook URL’ section. On the same page, you will also see the list of unique discount codes generated via API.
For unique codes you can also set an expiration date if you click the ‘Reward expiration’ toggle button. Once it’s turned on (blue) you can type the number of days customers will be able to use the code to get the percentage discount.
c. Free shipping
This option allows your customers to enjoy free shipping for their orders by using a code.
You should type in the ‘Title’ field the message that will be visible in the on-site Launcher. This text should inform users about the benefits they will get when reaching that tier. Keep the texts short and clear (e.g., “Free Shipping”).
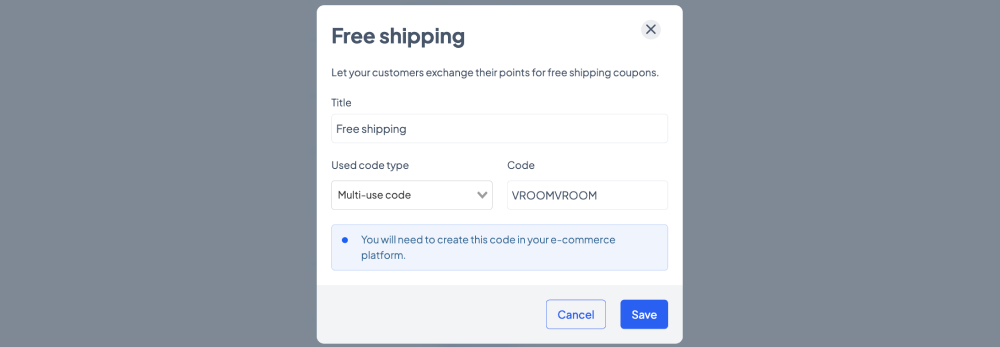
For the coupons, you can use two types of codes:
- Multi-use codes - which you need to create first in your e-commerce platform then paste in the ‘Code’ field when the ‘Multi-use code’ option is selected under ‘Used code type’
- Unique codes (API) - these will be automatically generated through API.
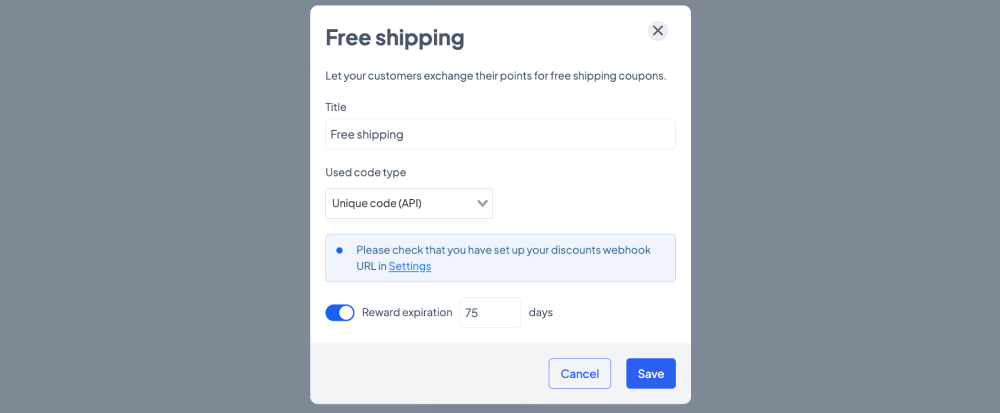
To dynamically generate discount codes, you will need to have an endpoint on your website that can be called by theMarketer. This webhook URL for generating discount codes in your platform needs to be mentioned in the ‘Settings’ > ’Coupons’ > ’Discounts webhook URL’ section. On the same page, you will also see the list of unique discount codes generated via API.
For unique codes you can also set an expiration date if you click the ‘Reward expiration’ toggle button. Once it’s turned on (blue) you can type the number of days customers will be able to use the code to get free shipping.
The easiest way to work with rewards is to opt for progressive percentage discounts. For example, 4% off for the second tier, 6% off for the third, 8% for the fourth, 10% for the fifth, and 15% for the top tier. But keep in mind people value free shipping more than any other benefit when it comes to shopping online.
Ultimately, the benefits you give your customers for climbing the loyalty program ladder will depend on your margins, logistics terms and conditions, and your overall strategy.
8. Decide when to allocate and cancel the points.
You can choose to allocate order-related points on the spot or as soon as the order changes to a specific status, which you can select from the drop-down list. The items you see in the drop-down list are fetched via API from your own eCommerce platform.
Let’s suppose a customer has 2,500 points and places and order. According to your rules, this action is rewarded with 500 points. The customer needs 3,000 to level up to the next tier and enjoy free shipping.
If you decide to allocate the points immediately, they could advance to the next tier as soon as their order is confirmed and they could, therefore, place another order with free shipping the very same moment.
If you decide to allocate the point when the order status changes to ‘Delivered’, then the customer will level up only when the parcel reaches them.

A similar principle applies to point cancellation.
You can decide that once allocated, points cannot be canceled or you can choose to cancel them if the order changes to another specific status, which you can select from the drop-down list.
Taking the same example as before, let’s say you’ve allocated the points immediately and now the customer has a point balance of 3,000. If they return the order a few days later, and the status of this order changes to ‘Returned’, you could cancel the 500 points, leaving them with a point balance of 2,500.
9. Set an expiration date for the points.
Depending on your niche, some customers will purchase more frequently than others. But to keep your loyalty program engaging, you should set an expiration date for users’ points. Otherwise, you might risk having too many customers in the top tier as years pass by.
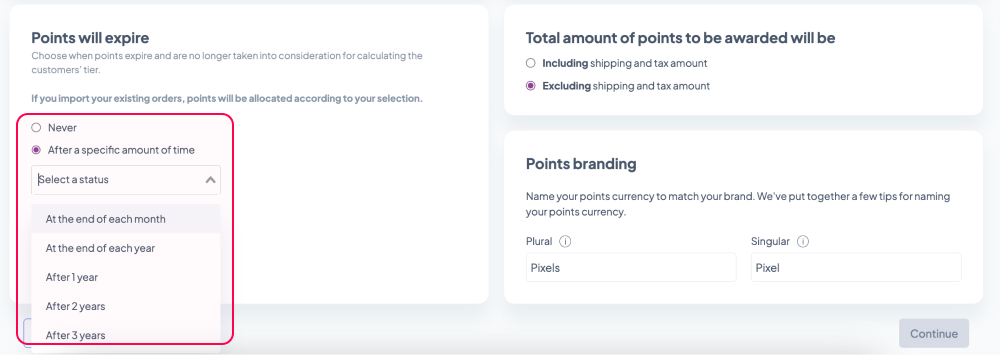
If you do decide to set an expiration date for your points, this could be:
a. At the end of each month - on the first day of each month all loyalty program members will have their point balance reset to 0, meaning they will all be downgraded to the bottom tier.
This option could be suitable for restaurants, online supermarkets, or businesses with very high order frequencies.
b. At the end of each year - on January 1st of each year all loyalty program members will have their point balance reset to 0, meaning they will all be downgraded to the bottom tier.
This option could be suitable for businesses with medium to high order frequencies, such as online shops in the fashion and accessories, pharmaceutical, or kids & toys industries.
c. After 1 / 2 / 3 year(s) - this option treats each point allocation as individual, each with a 1, 2, or 3-year validity period.
For example, let’s suppose a user joins the loyalty program on May 15th, 2023. They place an order on May 20th, 2023, one on September 14th, 2023, one on December 8th, 2023, and another one on October 22nd, 2024. According to your rules, for each order they get 500 points, they need 1,000 points to go form the first to the second tier, and points expire after 1 year.
The evolution of their point balance will be:
- 15.05.2023 - 0 points - 1st tier (joined program)
- 20.05.2023 - 500 points - 1st tier (placed order)
- 14.09.2023 - 1,000 points - 2nd tier (placed order - upgrade)
- 08.12.2023 - 1,500 points - 2nd tier (placed order)
- 20.05.2024 - 1,000 points - 2nd tier (points expired)
- 14.09.2024 - 500 points - 1st tier (points expired - downgrade)
- 22.10.2024 - 1,000 points - 2nd tier (placed order - upgrade)
- 08.12.2024 - 500 points - 1st tier (points expired - downgrade)
This model is optimal for businesses with low order frequencies, such as online shops in the home & deco, electronics, automotive, or kids & toys industries.
10. Decide the base on which the points will be calculated.
If you set minimum order value rules or allocate incremental points based on the value of the order, should the sales tax and shipping be included or excluded?
For example, let’s suppose a customer places an order amounting to 100 euros (out of which 20 euros represent the sales tax) plus 10 euros for shipping. If you have a minimum order value rule stating that only orders over 105 euros will be rewarded with points, should the customer receive those points?
If you include shipping and tax, they will, because 80 euros (products) + 20 euros (tax) + 10 euros (shipping) = 110 euros > 105 euros.
If you exclude them, they won’t, because 80 euros < 105 euros.
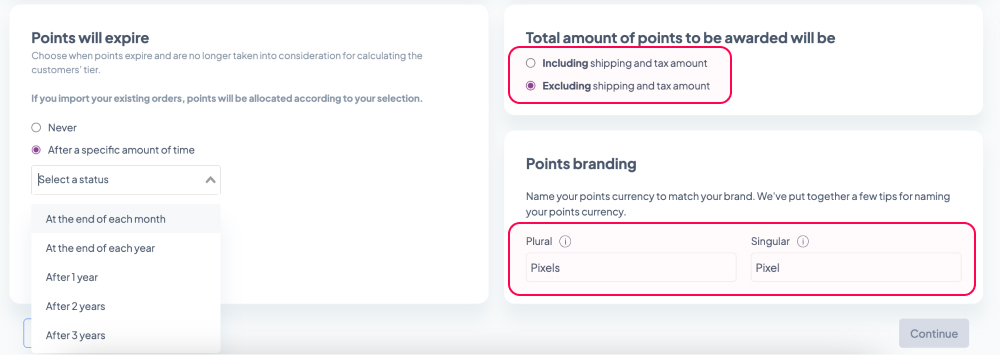
11. Name your points.
You don’t have to stick to “Points”. Bring your customers closer to your brand and choose a representative name that will remember.
Type the plural and the singular form in the two fields available and create your own virtual currency. “Pixies”? “Schmeckles”? “Fudgecoins”? The choice is yours.
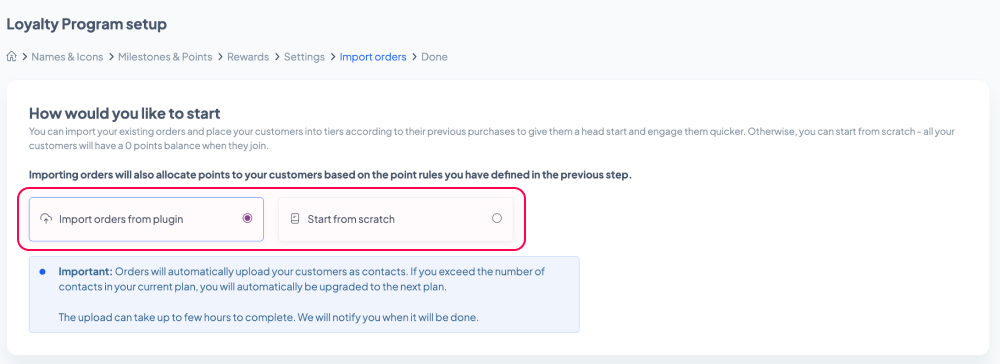
12. Import existing orders.
If you’d like to give your customers a head start and allocate points for the orders they have already placed, you can automatically import orders using the plugin. This will also upload your customers as contacts and if you exceed the number of contacts in your current plan, you will automatically be upgraded to the next plan. The upload will take up to few hours to complete and you will be notified when the process is complete.
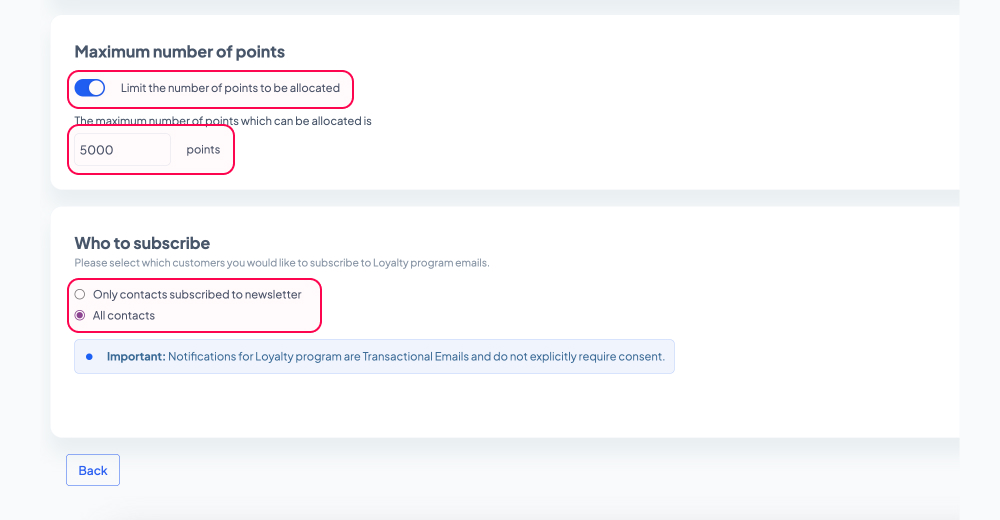
To place less weight on previous orders, you can limit the number of points to be allocated as a result of the order import process. Click the ‘Limit the number of points to be allocated’ toggle button. Once it’s on (blue), you can then type the maximum number of points your customers will receive in the newly appeared field.
You can also choose which customers will be subscribed to loyalty program emails as part of the import. Loyalty program emails are considered transactional, and do not require explicit consent, unlike newsletters, for example.
If you decide to start from scratch, all customers will start with 0 point balance.
And… you’re done!
You now have a well-structured loyalty program that can help foster lasting relationships with your customers and drive repeat business.
Related articles
STILL HAVE QUESTIONS?